iPhone Suica & Pasmo: Setup, Apple Pay & Error Fixes
Tokyo Mate
On an iPhone you can add a Pasmo or Suica to the Wallet app and use it as a Japanese transit card. Here's the whole sequence: registering a Pasmo, issuing a Suica, topping up with Apple Pay, fixing top-up errors, and transferring to a new device.
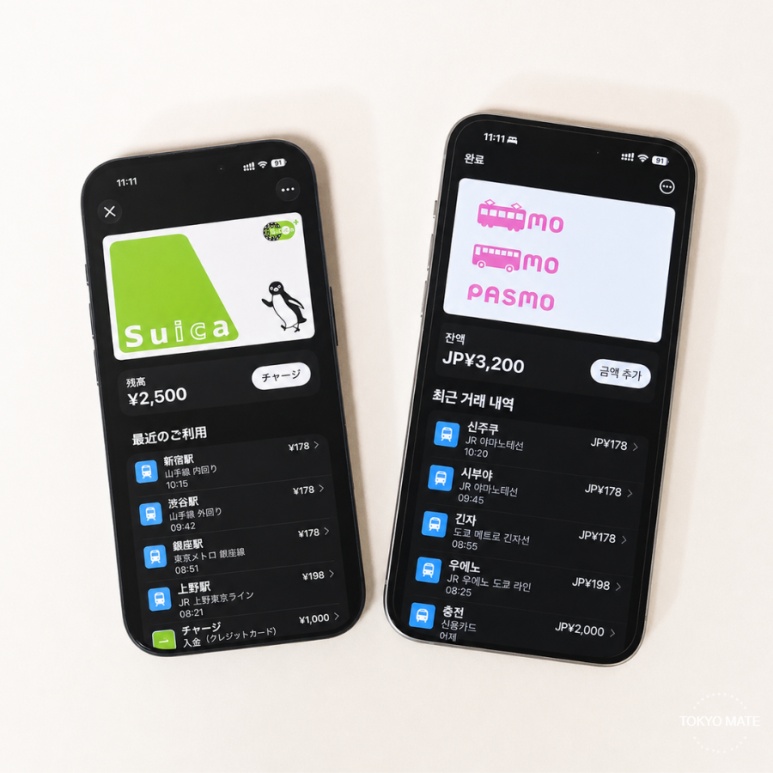
What to Prepare Before Adding Pasmo or Suica to Your iPhone
Check the items below before you start registering a Pasmo or issuing a Suica.
✅ Pre-registration checklist
- iPhone 8 or later, or Apple Watch Series 3 or later
- Signed in to your Apple Account with two-factor authentication
- Face ID, Touch ID, or a device passcode set up
- The latest iOS update
- A payment card to use in Apple Wallet
- A stable internet connection
- If you're transferring a physical Suica or Pasmo, have the existing card ready
📌 You don’t need to make both Pasmo and Suica
Pasmo and Suica are run by different companies, but for travelers the coverage and the way you use them are almost the same.
You can use either one on most major Japanese railways and buses that display the transit IC card mark, so picking just one is enough.


How to Add Pasmo or Suica and Make the First Top-Up
You can issue a new Pasmo or Suica right in the iPhone’s built-in Wallet app without installing a separate app.
The registration steps are the same for both cards: pick either PASMO or Suica from the card list. Registration and the first top-up happen together, so add the card you’ll pay with to Apple Wallet in advance.
The iPhone Wallet app lets you choose from these four Japanese transit cards.
- PASMO: transit card from Tokyo's private railway and subway group
- Suica: transit card from the JR East group
- ICOCA: transit card from the JR West group in the Kansai region
- TOICA: transit card from the JR Central group in the Tokai region
All four work on Tokyo's major railways and buses that display the interoperability mark, and at transit IC card member stores. If you already added an ICOCA or TOICA to your iPhone while traveling in another region, you don't need to create a new PASMO or Suica for a Tokyo trip. If this is your first card, just pick either PASMO or Suica.
⚠️ If you add a TOICA in Apple Wallet or transfer a physical TOICA, the mobile card is issued as an ICOCA.
✅ Steps to add Pasmo or Suica on iPhone
- STEP 1. Open the Wallet app on your iPhone.
- STEP 2. Tap the + button at the top right.
- STEP 3. Select Transit Card.
- STEP 4. Choose PASMO or Suica from the list of Japanese transit cards.
- STEP 5. Select Add New Card.
- STEP 6. Choose the amount for your first top-up and tap Add Money.
- STEP 7. Approve the payment, and your Pasmo or Suica is registered with the first top-up done.
How to Top Up Suica or Pasmo with Apple Pay
Once you’ve issued a Suica or Pasmo on your iPhone, you can add balance with Apple Pay in the Wallet app.
To use this, the credit, debit, or prepaid card you want to pay with has to be registered in the Wallet app.
- STEP 1. Open the Wallet app on your iPhone.
- STEP 2. Select the Suica or Pasmo you want to top up.
- STEP 3. Tap Add Money and enter the amount you want.
- STEP 4. Choose the card to pay with.
- STEP 5. Double-click the side button and approve with Face ID, Touch ID, or your passcode.
⚠️ Once the top-up finishes, check in the Wallet app that the balance went up. The maximum balance for Suica and Pasmo is 20,000 yen.
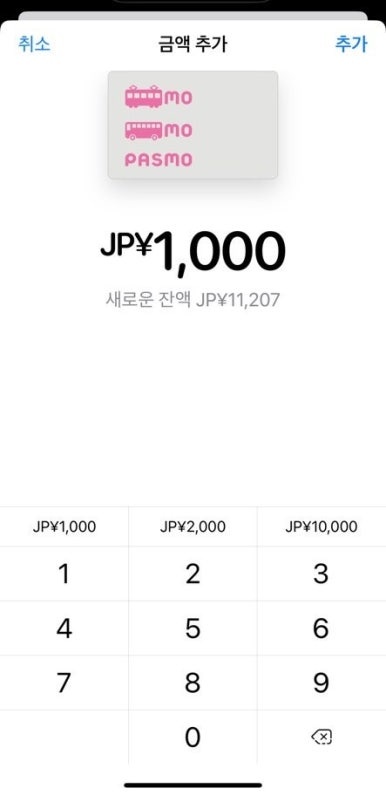
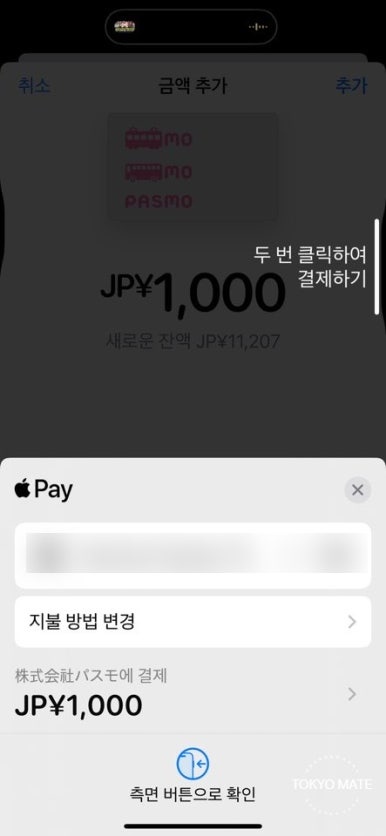
📌 If Apple Pay top-up doesn’t work, you can top up with cash
If your Apple Pay payment isn’t approved, or you’d rather use cash, you can top up at compatible machines in Japanese stations, at convenience store registers, and at some ATMs.
Fixing Apple Pay Top-Up Errors for Pasmo and Suica
If a Pasmo or Suica top-up won’t go through on your iPhone, check the following in order.
1. Check whether it’s a time when top-ups are available
Between midnight and 5 a.m. Japan Standard Time, some functions including adding a transit card and topping up may be suspended. If the error happens during that window, try again after 5 a.m.
2. Check the payment card in Apple Wallet
Make sure the payment card is properly registered in the Wallet app. If payments keep getting declined, check your card’s limit and balance, whether overseas or online payments are blocked, and any suspension setting in your card issuer’s app. If you have several cards in Apple Wallet, you can pick a different one on the top-up screen and try again. Even a card registered with Apple Pay isn’t always approved for Pasmo or Suica top-ups.
3. Check that the balance won’t go over 20,000 yen
The balance limit for Pasmo and Suica is 20,000 yen. If your current balance plus the new top-up would exceed 20,000 yen, the top-up won’t go through, so lower the amount and try again.
4. Check iOS and Apple Pay status
Update your iPhone to the latest iOS and try topping up again. If the error continues, restart your iPhone and check Apple’s System Status page for an Apple Pay outage.
5. If the balance doesn’t change after topping up
Select your Pasmo or Suica in the Wallet app, then turn on More → Card Details → Service Mode. Authenticate with Face ID, Touch ID, or your passcode to reload the balance information. When you’re done, tap the card once to exit Service Mode.
📌 When Apple Pay top-ups keep failing
If card payments are declined repeatedly, you can top up with cash at compatible machines in Japanese stations, at convenience store registers, and at some ATMs.
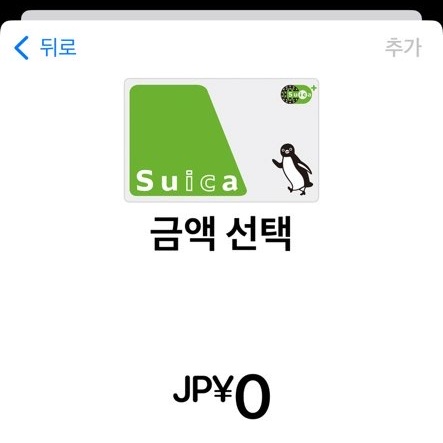
How to Use Pasmo or Suica at the Ticket Gates
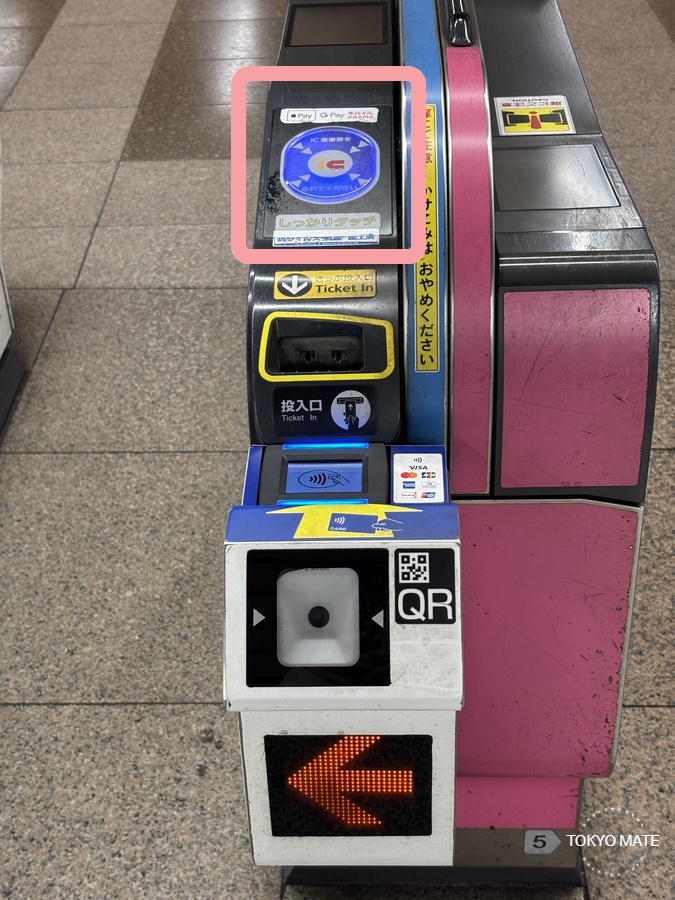
When you add a Pasmo or Suica to your iPhone, Express Mode is turned on by default.
You don’t need to open the Wallet app or authenticate with Face ID. Just hold the top of your iPhone near the gate reader. Keep the iPhone close to the reader until the confirmation message and checkmark appear on screen.
You can use it at the gates even without a cellular data or Wi-Fi connection.
How to Move Pasmo or Suica to a New iPhone or Apple Watch
A Pasmo or Suica card can only be stored on one device at a time. To use it on a new iPhone or Apple Watch, you have to transfer the card and its balance to that device.
✅ Moving to a new iPhone
If you’re in the middle of setting up a new iPhone, you can select the transit card to move in Wallet and transfer it by following the on-screen instructions. If you’ve already finished setting up the new iPhone, do this instead.
- STEP 1. Open the Wallet app on the new iPhone.
- STEP 2. Tap the + button at the top right.
- STEP 3. Select Cards Found for This Account.
- STEP 4. Choose the Pasmo or Suica you want to move and add it by following the on-screen instructions.
To finish the transfer, the old iPhone has to be nearby and connected to the internet. Once the transfer is done, you can’t use that transit card on the old iPhone. You can’t move the card while you’re in the middle of a transit ride.
✅ Moving from iPhone to Apple Watch
If you move the card to an Apple Watch, you can’t use the same card on your iPhone at the same time.
- STEP 1. Open the Watch app on your iPhone.
- STEP 2. Select My Watch → Wallet & Apple Pay.
- STEP 3. Tap Add next to the Pasmo or Suica you want to move.
To move it back to the iPhone, select the card in Wallet & Apple Pay in the Watch app and tap Add Card to iPhone.
✅ Does the balance disappear if you delete the card from the Wallet app?
Removing a transit card from the Wallet app doesn’t make the remaining balance disappear. You can add the card again on an iPhone or Apple Watch signed in with the same Apple Account and keep using the balance. Removing a card is not a balance refund.
- STEP 1. Select the transit card in the Wallet app and tap More.
- STEP 2. Select Card Details.
- STEP 3. Scroll down, tap Remove Card, and then select Remove.
Pasmo and Suica on iPhone FAQ
Q. Can I use Pasmo or Suica when my iPhone is out of battery? A. On supported iPhones, if your Pasmo or Suica is set to Express Mode, you can still use it at the gates for up to five hours after the battery runs out, thanks to power reserve. Press the side button and check whether the low-battery screen appears with a note that Express Cards are available. It won’t work if the power reserve is also used up or if you turned the iPhone off yourself.
Q. Can I register a Pasmo or Suica before my trip? A. Yes, as long as your device settings are done and the first top-up payment is approved with a card registered in Apple Wallet, you can register before you leave. Setting it up in advance means you can use it as a transit card as soon as you arrive in Japan.
Q. Can I move a physical Suica or Pasmo card to my iPhone? A. Some physical Suica and Pasmo cards let you transfer the remaining balance to the iPhone Wallet app. Once the transfer is complete, the physical card can no longer be used, and the card deposit is added to your mobile transit card balance.
Q. If Apple Pay top-up doesn’t work, can I top up with cash? A. A Pasmo or Suica added to your iPhone can be topped up with cash at compatible machines in Japanese stations, at convenience store registers, and at some ATMs.
Having just one Pasmo or Suica on your iPhone makes getting around Tokyo much easier. At the gates, hold your iPhone up lightly, and when the balance runs low, top up with Apple Pay in the Wallet app.
If you’d rather use a physical transit card or top up with cash, take a look at the Tokyo Mate transit card guides below.
🧡 Tokyo Mate Transit Card Guides
👉 Tokyo Transit Cards Compared: Suica, Welcome Suica, Pasmo, and Tourist Pasmo